Thursday, January 29, 2015

Arbi Tava Fry / Seppankizhangu Varuval / Colocasia Roast


After a massive , historic blizzard dumped 35 inches of snow , both body and mind started thinking of something hot and spicy food. Yet I didn't wanted to come out  of my comfort zone. With schools and offices closed, we got a family lunch time. Each one started making choices. This is what I ended up with. A simple South Indian fare with steamed rice , drumstick sambar , dal tadka , arbi tawa fry and butter milk.


Back in India , the arbi (seppankizhangu in Tamil ) used to be petite. Here in US , I feel like these have grown extra large and hard too . When I got these beauties for the first time, ended up trouble cooking them to the exact consistency.With 2 whistles in pressure cooker too , these were adamant to get cooked. Slowly I've got used and make varieties now. It shouldn't be neither mushy nor hard.


Coming to the recipe, this is  simple and quite easy one to make. But you need to have some extra time to achieve the perfect crispness. The outer layer is real crisp and the inner is velvetty soft.

What do you think, this can be teamed up with ? Sambar / vatral kuzhambu and Garlic Rasam makes a perfect deal. Also curd rice with crisp arbi makes it more interesting.


Why to wait ? Go ahead and make it and enjoy !!

Ingredients 

Arbi / Seppankizhangu/ colocasia ................................. 1 lb (app 1/2 kg)
Turmeric .................................................................. 1/2 tsp
Asafetida .................................................................. 1/4 tsp
Red chilli Powder ...................................................... 3/4 tsp
Sambar Powder ....................................................... 1/2 tsp (optional)
Salt ......................................................................... to taste
Oil ........................................................................... 2 tbsp
Lemon juice ............................................................. 1 tsp (optional)

Method
  1. Pressure cook the arbi . It shouldn't be neither mushy nor hard.
  2. Let it cool and peel off the skin.
  3. Cut them into discs (not too thin)
  4. To the arbi , add all the dry powders and a bit of oil.
  5. Let it sit for 15 minutes.
  6. Mean while heat a griddle ( I used a cast iron tawa)  on medium high .
  7. Drizzle a bit of oil and place the arbi discs gently.
  8. Lowe the heat to medium.
  9. Now drizzle some oil along the sides of each arbi.
  10. Cook for 7 minutes / until you achieve a perfect crisp on one side.
  11. Now gently turn them and do the same for this side too.
  12. Add lemon juice now and  let cook for 3 more minutes.

Note

  • If the arbi turns mushy , it becomes difficult to handle.
  • Using iron tawa / griddle helps in faster cooking and better result.
  • Using lemon juice is completely optional. You can stop with step 11 in that case.


Monday, January 26, 2015

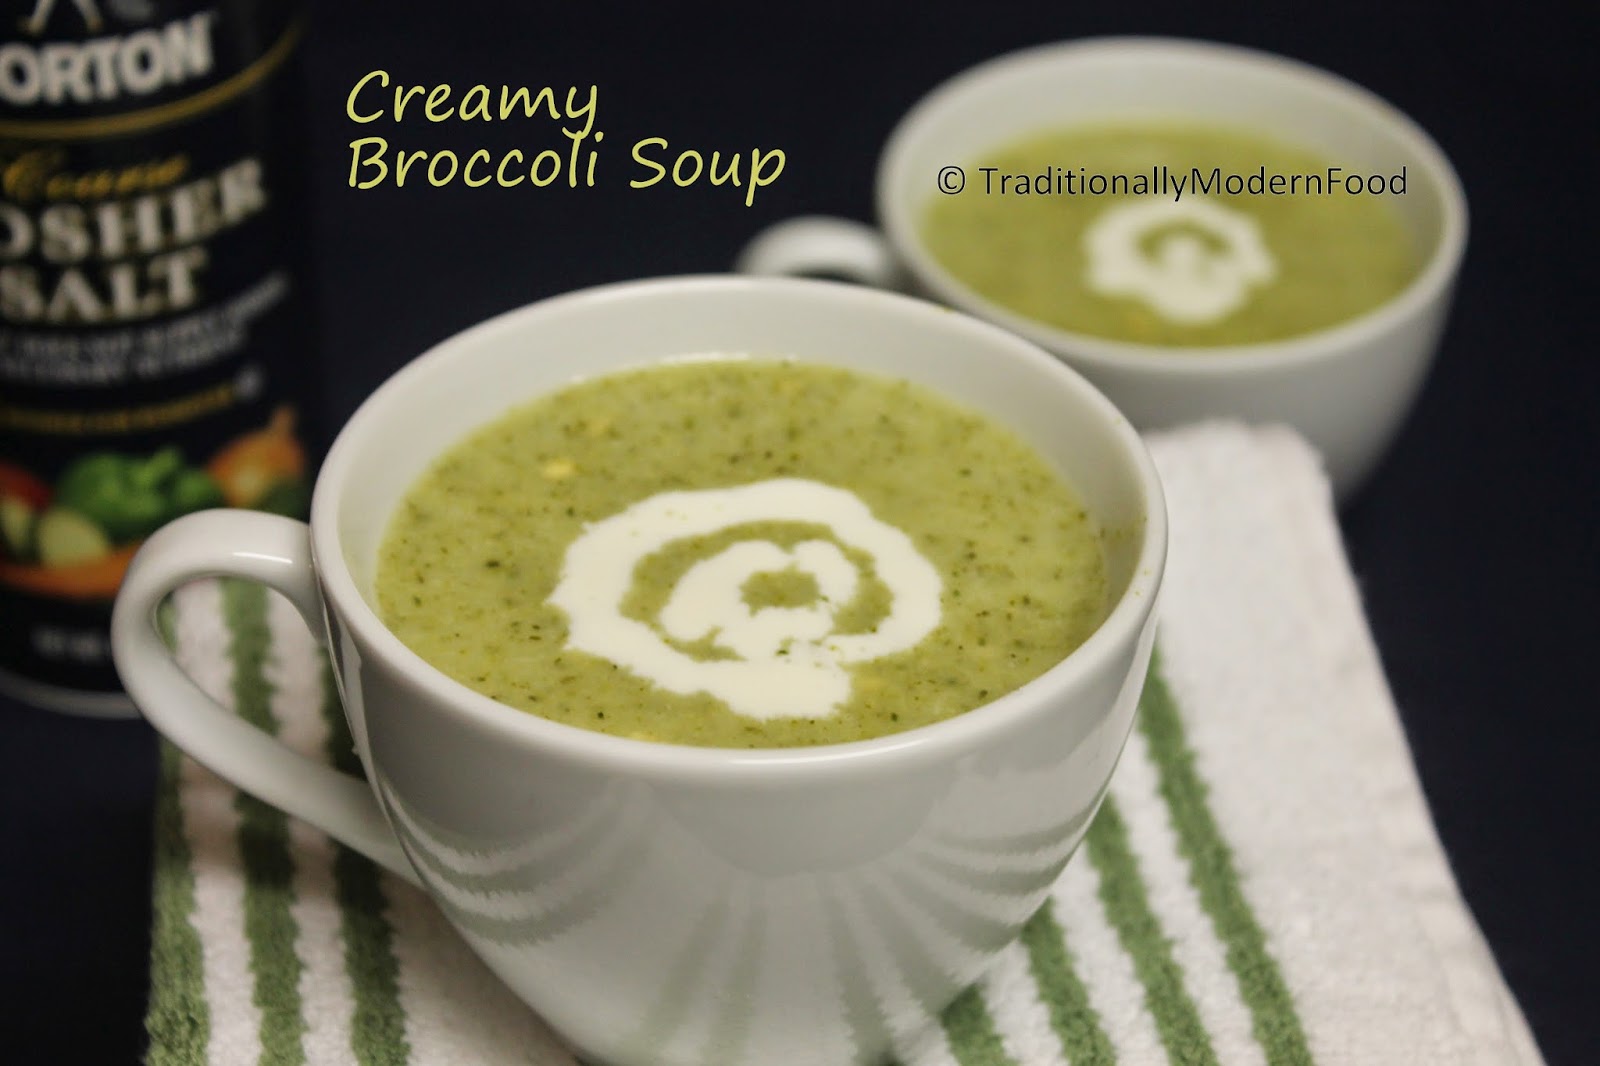
Creamy Broccoli Soup , a guest post by Vidya

Winter has started showing the true colors now and tonight we are about to face a historic blizzard.The bitter cold weather demands some hot soups, right. My friend Vidya from Traditionallymodernfood is here  with us today to share her interesting recipe. Simple and straight forward is her mantra I would say.

Now , over to Vidya.


Thanks a lot Sujatha, for giving the opportunity to write a guest post for you. Its my pleasure to
be featured in Spices N Treats !


Before getting into the recipe, a small intro about my blog

I am Vidya, author of “Traditionally Modern Food” blog. I enjoy various Cuisines, and started
trying my hand in preparing the food I loved. You can find a mix of vegetarian Indian and
International recipes in my space. I have a Little one, so I prefer spending less time in kitchen,
and most of my recipes reflect that. Snacks are something I cherish, but I get conscious of the
calorie factor, so I also try to make traditional Indian snacks with minimal oil (Baking) .

When chill weather calls for a hot soup, how about creamy Broccoli Soup!


Ingredients:

Broccoli - 1, big cut into florets
Onion - 1/2, thinely sliced
Garlic - 1 pod
Potato - 1, small peeled and cut into big chunks
Water - 2 cups
Butter - 1 tsp
Olive oil - 1 tsp
black pepper - to taste
Kosher Salt - as needed
Heavy whipping cream - 3 tbsp
Cheese - 3 tbsp

Method:

1. Add oil and butter to the pan, and when its hot add onion and garlic, sauté till the
onions are translucent.

2. Add broccoli and potato and sauté for 2 -3 minutes. Add water and cover the lid. Cook
till the vegetables are fork tender and switch off. Let it come to room temperature. Put
the vegetables in a mixie / blender along with little vegetable stock and puree them to a
smooth texture. Keep the remaining vegetable stock in the pan .

3. Transfer the puree to the same pan containing vegetable stock, mix well. Add salt,
pepper, and cream. Cook in low heat to avoid curdling. Add cheese and cook till the
cheese melts, switch off and enjoy the warm soup.

 Notes:

1 Instead of broccoli, cauliflower can also be used
2. Instead of cream, milk can be used
3. If you decide to go vegan, use avocado for the creamy texture and replace butter with
   oil
4. Instead of kosher salt, regular salt can also be used

Friday, January 23, 2015

Mangalorean Biscuit Ambado and celebrating 100 th post !!!

New year has given me a new beginning and a new opportunity ! Such a nice feeling to share with you all . This has been a journey of learning I would say. Now I feel like , it's time to explore and bring more along with traditional and regional recipes.

One such opportunity is what I got through ChefsAcrossBoundaries.A hand full of food enthusiast with a passion to learn and share the hidden gems about food and related customs all across the globe.
This month I got to learn a bit about Mangalorean Cuisine.


Thanks to Suchitra Shenoy from daawatesuchi for the great insight on the same. A very popular snack from their cuisine is 'Biscuit Ambado ' served with ginger chutney.Ambado meaning vada in regional language, biscuit didn't give a significant meaning though, yet to learn.

The process of learning through the recipe made me realize that it is a close cousine of of Medhu Vada from Tamil cuisine.The main difference is the shape, these are small balls whereas medhu vada in doughnut shape. Interesting that unity in diversity applies to food to in India. Here is the original recipe from Suchitra Shenoy .


Coming to the recipe , it is very simple and straight forward. Make the batter and mix other ingredients and deep fry . Crispy on the outer and pillowy soft inside with flavors from ginger and curry leaves, texture from coconut pieces makes every bite interesting !


Recipe

 urad dal .................................. 1 cup
 fresh coconut......................... 1/4 cup cut into small pieces like slivers (adjust to taste)
curry leaves ............................ 10 - 12 roughly chopped
 ginger ........................... .........1 TBSP, finely chopped
 green chillies ....................... 2 to 3 finely chopped (adjust)
 Salt ...................................to taste
 Oil....................................... to fry
 Asafoetida .............................. 1/2 tsp (optional)

Method 

  1. Soak urad dal in water for 2 hours.
  2. Heat oil in a deep pan/ kadai , preferably medium flame.
     Drain the water and grind urad dal it into a paste , without any water, 1 tbsp unless otherwise required.
  3. The batter must be thick and fluffy.
  4.  Add coconut,green chillies,curry leaves,ginger, asafoetida and salt.Mix well with
    hand.
  5.  Once the oil is hot ,drop small balls of the batter into the oil.See to it that the heat
    is on medium flame.
  6.  If you find difficulty in making small balls ,you can wet your hands with water
    and then make the small balls.
  7.  Remove it once it golden brown.
  8. Serve with ginger chutney.
Ginger Chutney

Grind 1⁄2 cup coconut with 2 tamarind pods,2 green chillies,small piece ginger.
Make a smooth paste.Add salt
Add tadka of oil, mustard seeds curry leaves to it.Mix well
Your chutney is now ready


Tuesday, January 20, 2015

Cabbage Avial (Yogurt based gravy) and holding on to the roots

I hope you all had a great Pongal / Sankranti .
Joining me to turn your boring cabbage into a delicious curry that too in under 15 minutes ???

Cabbage Avial ? might looks strange to you all . Well , avial is a vegetarian delicacy (yogurt based gravy ) from Kerala usually prepared with mixed vegetables. You can have a look at the traditional recipe here . I've earlier shared with you all that my roots are from Kerala.


I've heard lot of stories related to this from my grandma.This particular method of preparing avail with cabbage is my great grandma's (strange ) idea which has been now passed on to me by my mom.Now I enjoy making two three varieties of avial and hope to pass on this !!

 Slight crunchiness from the cabbage, tanginess from yogurt, richness from coconut and flavors from curry leaves and coconut oil ... mm all you will need is a hot steaming rice to go with it .But yes, if you are like me then pair it with spicy potato curry and relish !!


The key for this gravy is some fresh coconut and thick and sour yogurt. When you have this , all it takes is just 15 minutes to make your trip to Kerala.


Ingredients

Cabbage ........................ 2 cups ,Shredded / thinly sliced
Coconut ....................... 1/2 cup , grated , preferably fresh
Green Chillies ............... 2
Yogurt ........................... 3/4 cup , preferably sour
Curry Leaves  ................ handful
Coconut oil .................... 1.5 tbsp
Turmeric ....................... 1/2 tsp
Salt .............................. to taste

Method 

  1. Grind coconut and green chillies to a fine paste and set aside.
  2. Whisk the yogurt well and set aside.
  3. In a deep pan , add about 3/4 cup water and cabbage, turmeric and salt.
  4. Cover and cook till the cabbage is 50 % cooked.
  5. Stir in the coconut paste and cook for another 3 minutes.
  6. Now add the yogurt and roughly chopped curry leaves.
  7. Adjust the consistency, if you need.
  8. Cover and cook for a minute.
  9. Check the seasoning now and add the coconut oil on top .
  10. Turn off the heat and cover .
  11. After 5 to 7 minutes, the avial will be ready .


Note

  • Be generous with coconut and curry leaves.
  • Coconut oil is a must to get the deep flavors.
  • Try not to over cook the cabbage.


Wednesday, January 14, 2015

Sakkarai Pongal | Sweet Pongal | Pongal & Sankranthi special

Pongal or Sankranthi is the harvest festival of India celebrated at the end of harvest season .The significance of the festival is to thank God Sun who helped us with his shine to achieve good harvest and also the arrival of spring season.We make sakkarai pongal ,vadai, payasam and also some exotic dishes for lunch.But the main dish is sakkarai pongal.


Ingredients

Raw rice ............................. 1/2 cup
Split moong dal  ..................  2 tbsp ( you can add 3 tbsp too )
jaggery .............................. 3/4 cup ( add exctra if you like more sweet)
Ghee .................................. 3tbsp
Cashews ............................. few
raisin .................................. few
Green Cardamom ................ 3
Edible camphor .................... a pinch (pacha karpooram)
Nutmeg ............................... a pinch (powder)
Salt ..................................... a pinch
Water .................................. 2
Milk .................................... 1/2 cup (optional , add 1/2 cup extra water in case of not using this )


Method

  1. Add a little ghee to a pressure cooker and roast the moong dal until fragrant.
  2. Now add the washed rice to the cooker and add water and milk .
  3. Cover the cooker and cook till 4 to 5 whistles.
  4. Once the pressure settles down, open the cooker and mash the rice and dal.
  5. Mean while heat another pan and add tsp of ghee and fry the raisins and cashews and set aside.
  6. Now add the jaggery and 1/4 cup water to the pan.
  7. Once the jaggery melts , strain the jaggery syrup and add it to the same pan .
  8. Add the mashed rice dal mixture and stir well.
  9. Slowly start adding the ghee  and stir well.
  10. Continue to cook for another 5 to 7 minutes and add the crushed cardamom seeds, edible camphor,salt and nutmeg powder to this.
  11. Turn off the heat and stir in the cashews and raisins.


Monday, January 12, 2015

Chocolate pear Cake and Celebrating the Anniversary of Blogging

It feels really amazing as I'm completing a successful year of blogging.The idea of blogging wasn't a preplanned one. It just happened . From that moment there is no looking backs absolutely.Many many good friends I've made in this virtual world ,both for blogging and some for life too. Thanks to each one of you , who have stayed with me in the process of learning and sharing.


This moment definitely needs nothing but a sweet ,what do you think ?

Here comes my simple chocolate pear cake to cheer me and you.This is a quick and simple mild sweet cake full of flavors and textures.


I have used pear as I like the combination of chocolate and pear and pear doesn't over power the chocolate here making it taste both in a cake.You can choose something that compliments well with chocolate.


Ingredients

Flour ................................................. 1 cup (I used whole wheat, APF  ,1/2 cup each ( you can use 1 cup APF too)
Dark Brown Sugar ......................... 1/2 cup
Granulated Sugar .......................... 1/4 cup
Cinnamon powder ........................ 1/4 tsp
Nutmeg ...................................... a pinch
Flex seeds ................................... 4 tbsp * see notes
Butter Milk ................................. 1/4 cup
Butter ......................................... 1/4 cup , room temperature
Oil ............................................. 1/4 cup
Water .......................................... 2tbsp
Unsweetened Cocoa powder ... .......3 tbsp
Baking Powder .............................. 1 1/4 tsp
Pear .............................................1 small , peeled, cored and grated
Salt ............................................... a tiny pinch

Method 

  1. Preheat the oven to 350 F.
  2. Sift together the flour, salt,baking powder, cinnamon and nutmeg and set aside.
  3. Blend the flex seeds with water and set aside.
  4. In a mixing bowl ,add the butter and sugar and mix until creamy.
  5. Now add the oil,buttermilk to the butter mixture and incorporate well.
  6. Now stir in the flex mixture to this.
  7. Slowly add the cocoa powder to the liquid ingredients and mix gently until well combined.
  8. Now quickly mix the grated pear to the flour mixture and give it a quick stir.
  9. Add the flour mix with the liquid ingredients and gently incorporate well.
  10. Use a prepared loaf loaf tin (apply some butter and flour ) or  use cake liners.
  11. Bake for 20 to 25 minutes  if using liners or 35 minutes if using a loaf tin or until tooth pick inserted comes out clean.

Note

  • If you want to use eggs, you can replace flex seeds and water with 2 large eggs .
  • Mixing the pear with flour will avoid the pear forming lumps and settling down as chunks.
  • Baking time differs from oven to oven .


Friday, January 9, 2015

Kothamalli Thogaiyal | Instant Dry Chutney | Coriander Leaves Preserve in dry form

I wonder how certain things never fail to kindle your memories. This is one such for me that always kindles the plethora of those wonderful memories. When coriander leaves are in abundance , the first thing that my mom would opt is this as it has a good shelf life. Me and my sister will be assigned the work of preparing the leaves (getting the stem off and looking for the spoiled one and discarding them ). As a small girl I would always try to find an alternate to this job.


Good old memories quickly flashed when I saw these these on a good deal.Just to relive those memories I picked them and made the same one, the way my mom makes it.Simple pleasure of life!


Coming to the recipe, this is very simple to make and goes excellent with curd rice as such as a dry pickle. Make a quick chutney by adding some coconut . There are tons of ways I make use of this. Add a bit to your sir fries to make an interesting twist , add a pinch to your butter milk to make a masala butter milk.I do add these in the final tadka to dals and the list continues..


Ingredients

Coriander Leaves .................................... 1 big bunch, Fresh
Tamarind ............................................... 1 small marble size
Channa Dal ...........................................  3 tbsp
Urad Dal ...............................................  3 tbsp
Red Chillies ........................................... 10 (adjust to taste)
Asafoetida ............................................ 1/2 tsp
Salt ...................................................... to taste.

Method

  • Clean, trim the hard stems  and wash the leaves thoroughly.
  • Dry them over a cloth for 2 hrs / over night (if in a cold country)
  • Dry roast the dals until golden brown , transfer to cool.
  • Add a drop of oil to the same pan and fry the chillies until crisp.
  • Turn off the heat and add the tamarind.And leave it in the stove for couple of minutes.
  • Now transfer the dals along with chillies , tamarind , salt and asafoetida  to a blender and make a coarse powder.
  • Add in the coriander leaves and pulse well so that it is all nice and coarse.
  • Do not add water as the leaves contain some amount of natural water.
  • Make balls and store them in a air tight glass container.
  • It stores for a long when refrigerated.


Note


The leaves must be completely dry , a bit of water will ruin the chutney.
Use a spatula and clean the sides of the jar to get a uniform texture while you blend.

Wednesday, January 7, 2015

Kaju Katli | Cashew Fudge

Welcoming the year 2015 with you all.


While food is often associated with six basic tastes to satisfy the taste buds completely, there is always a sentiment to share sweets on special occasions.I'm not an exception too. Starting off with a simple sweet for this year.


2014 has been a memorable one, started my blog, met so many enthusiastic friends and  above all it was an year of learning for me. I hope the same continues and I push myself to reach my goals.


Now , coming to the recipe,This is a soft fudge very popular in India and just melts in your mouth. This is an easy peasy dessert that can be made in a jiffy with very minimal effort.The texture can be smooth or a bit grainy , you can make your choice. But I prefer mine little grainy so that I feel the texture in every bite of it.

Ingredients

Cashew Nuts ( coarsely ground ) .......................... 1 cup
Sugar ................................................................. 1/2 cup
Water................................................................... 3 tbsp
Rose water .......................................................... 1/2 tsp (optional)

Method

  1. Take the whole cashews and pulse few times to desired consistency ( try not to release the oil from it)
  2. Mix sugar and water in a wide pan and heat gently until the sugar dissolves completely.
  3. Now add the ground cashews and stir well in medium low heat for 6 to 8 minutes or until the cashews form a mass(dough).
  4. Transfer the  dough to a greased plate and gently knead to make smooth dough.
  5. Now line your rolling board with parchment paper / butter paper and transfer the dough gently .
  6. Place another parchment paper on the top and roll with a rolling pin gently.
  7. Cut them into desired shape.